How to Invoice as a Freelancer (Complete Guide)
Learn how freelancers can create, send, and manage professional payment requests, including key details to include, common mistakes to avoid, and tips for getting paid on time.

Freelancing gives you freedom, but getting paid requires a process. Whether you just landed your first client or you have a full roster of ongoing projects, knowing how to invoice correctly is one of the most practical skills you can develop. Proper invoicing is essential for credibility and professionalism. It protects you legally, keeps your cash flow healthy, and tells clients you mean business.
This guide covers everything: what a freelance invoice is, what to put in it, how to create and send one step by step, how to set payment terms, what mistakes to avoid, and how to follow up when payments are late. We’ll also touch on invoicing for international clients and what to do if you don’t have a registered company.
What Is a Freelance Invoice and Why Does It Matter?
A freelance invoice is a formal document you send to a client after completing work. It tells them what you delivered, what you charge, and when and how you expect to be paid. Unlike a bill (which simply states an amount), an invoice itemizes services and establishes the payment conditions both parties have agreed to.
Proper invoicing means clearly labeling the document as an ‘Invoice’ at the top, assigning a unique invoice number, and specifying both the invoice date and payment due date. This ensures your invoice is professional, avoids confusion, and supports legal and tax compliance.
Invoices matter for a few practical reasons:
- They create a paper trail. If a dispute ever arises about what you delivered or what was agreed, your invoice is your evidence.
- They keep you organized. Juggling multiple clients becomes much easier when every project has a numbered, dated document.
- They help with tax compliance. Tax authorities require freelancers to keep income records. Invoices are your income records.
- They signal professionalism. A polished invoice tells clients you take your work and their payment seriously.
Without invoices, you leave yourself open to confusion, delayed payments, or outright non-payment. Proper invoicing eliminates ambiguity before it becomes a problem and helps establish credibility and trust with your clients.
Essential Elements Every Freelance Invoice Must Include
Every freelance invoice should contain the same core information regardless of your field, your client, or the size of the project. Using a freelance invoice template or invoice template helps ensure consistency and professionalism across all your invoices, and you can further refine this with profession-specific freelance invoice templates. Missing any of these elements can delay payment or lead to disputes.
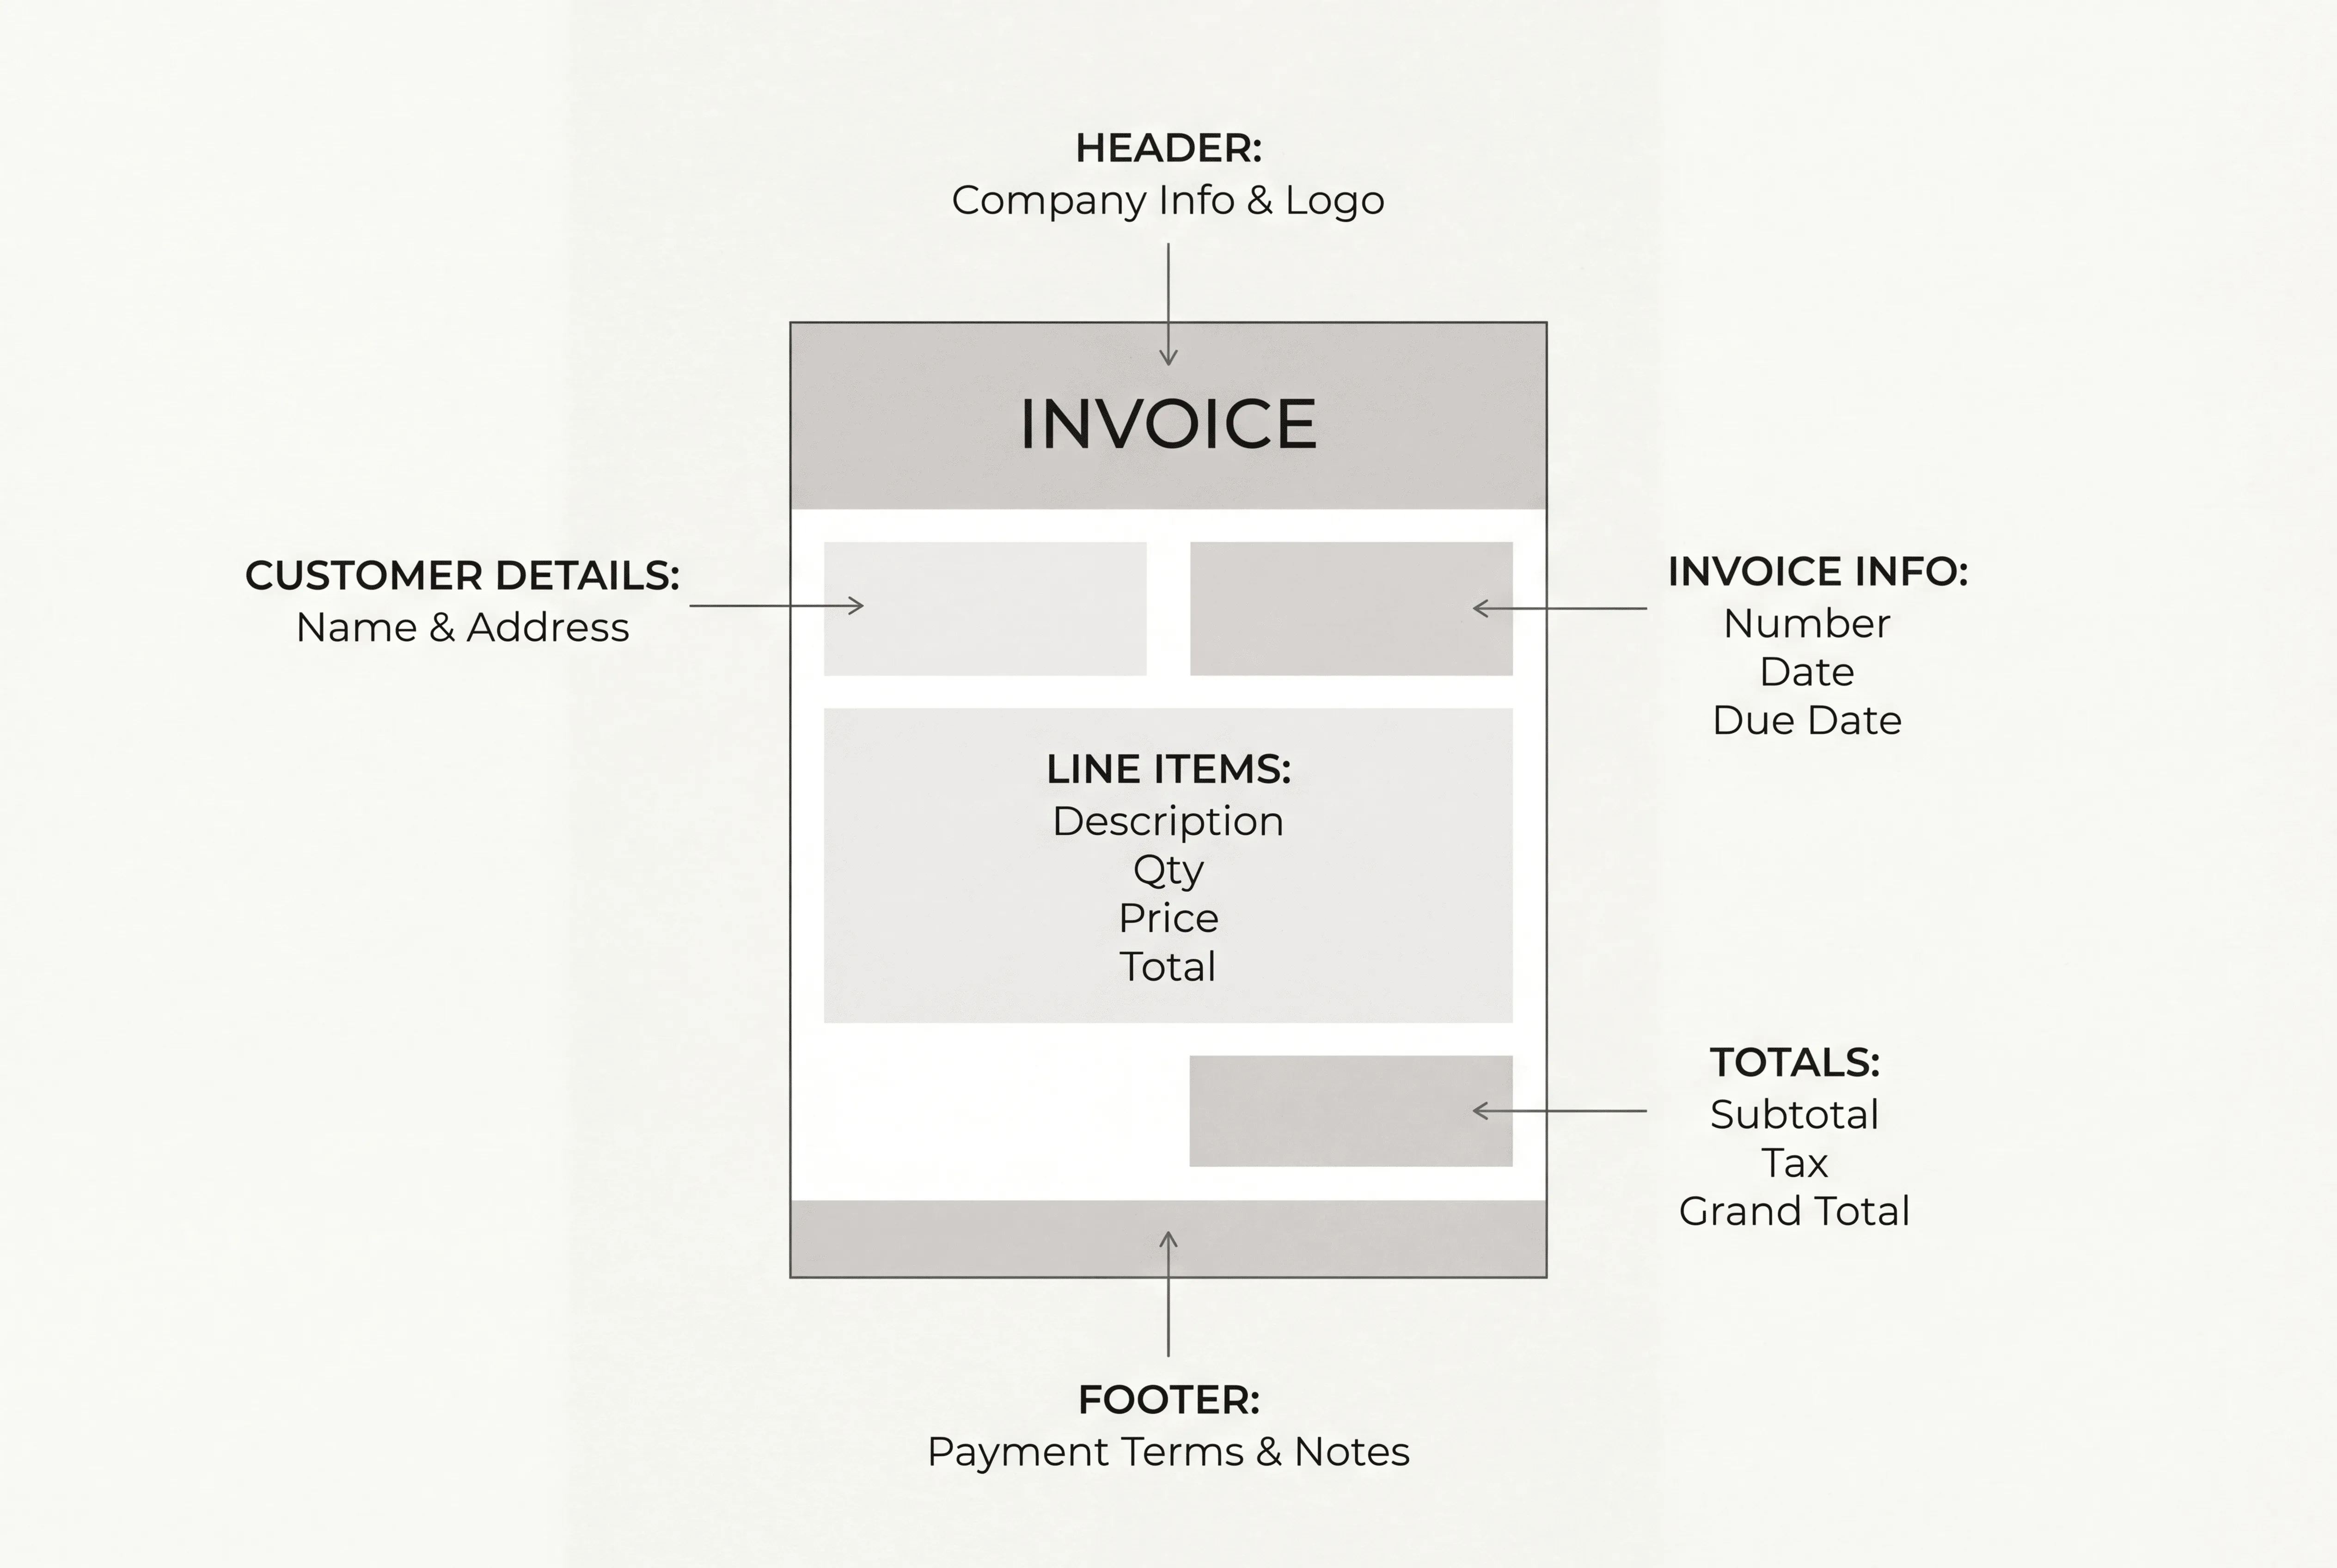
| Invoice Element | What to Include |
|---|---|
| Your Details | Full name or business name, address, email, phone number |
| Client Details | Official company name, billing address, accounts payable contact |
| Invoice Number | A unique identifier (e.g., INV-0042 or ClientName-001) |
| Invoice Date | The date you’re sending the invoice |
| Payment Due Date | Exact calendar date, not “Net 30” alone, but the actual date |
| Services Description | Clear line items: what you did, hours worked (if applicable), and the rate |
| Subtotal | Sum of all line items before taxes or fees |
| Taxes / Fees | Any applicable taxes, or note that services are tax-exempt |
| Total Amount Due | Final amount, in bold. Leave no room for confusion |
| Payment Methods | How the client can pay you (bank transfer, online platform, etc.) |
| Payment Terms | Your rules: due date, late fees, early payment discounts if any |
| Notes (Optional) | A thank-you line, upcoming project reminder, or special instructions |
You can use Microsoft Word or other tools to create and customize your invoice template, making it easy to adapt for each client. Managing multiple invoices efficiently is important for freelancers working with several clients, and using consistent templates and clear itemization helps streamline the process.
A Note on Invoice Numbers
Your invoice numbering system doesn’t need to be complicated, but it does need to be consistent. A simple sequential system (INV-001, INV-002) works fine for most freelancers starting out. As you scale, you might add a client or year prefix: ACME-2025-001 or 2025-045. The goal is to be able to find any invoice in your records instantly and track which ones are outstanding. Maintaining records and tracking client accounts is essential for managing multiple invoices and monitoring outstanding payments efficiently.
Example: Service Description Done Right
Vague descriptions cause disputes. Compare these two approaches:
| Example |
|---|
| ❌ “Writing services: $800” ✅ “Blog content writing - 4 articles (1,200 words each) for April 2025 content calendar @ $200/article = $800” |
The second version removes all ambiguity. The client knows exactly what they’re paying for. Always include all the details in your invoice to ensure clarity and smooth payment processing. When possible, attach supporting documentation, such as time logs for hourly work or outlines of project deliverables, to provide comprehensive information and strengthen your case if any invoice disputes arise.
How to Create and Send a Freelance Invoice: Step by Step
Creating an invoice doesn’t have to take more than a few minutes once you have a system. Here’s how to do it well from start to finish. Using accounting software, invoicing tools, or a free online invoice generator can streamline the entire process and billing process for freelancers, making it easier to create, send, and manage invoices efficiently.
- Gather your client’s details: Make sure you have the correct legal name, billing address, and contact information for your client. Double-check if they require a purchase order (PO) number or specific reference.
- Assign an invoice number: Use a unique, sequential invoice number for each invoice. This helps both you and your client track payments and stay organized.
- Add your business information: Include your name, business name (if applicable), address, and contact details. If you’re using a platform like Ruul, your information will be automatically included.
- List the services provided: Clearly describe the work you completed, including dates, deliverables, and rates. Break down the charges if you did multiple tasks.
- Calculate the total amount due: Add up your fees, apply any taxes or discounts, and show the final amount your client needs to pay.
- Specify payment terms: State your payment deadline (e.g., “Net 14” or “Due within 14 days”), accepted payment methods, and any late fee policies. Choosing the best payment methods and gateways for your situation helps ensure smoother, faster payments.
- Include payment instructions: Provide clear instructions for how your client can pay you. If you use Ruul, payment links and bank details are automatically included.
Double-check and send: Review your invoice for accuracy, then send it to your client via email or your invoicing platform.
Using dedicated invoicing software or invoicing tools can automate the process of creating and sending invoices, tracking payments, and sending reminders. This makes the entire billing process more efficient and helps freelancers manage their finances with less manual effort.
The items above give you the quick version. Here’s the full breakdown of each one.
Step 1: Set Up Your Branding
Your invoice is part of your professional image. Your name or business name, logo, and contact details prominently at the top. If you have a logo, include it. If you don’t, clean formatting (consistent fonts, well-spaced sections) will do the job. A polished invoice signals that you respect your work, and clients take that seriously.
Step 2: Label It Clearly
Put the word “Invoice” in large, readable text at the top of the document, not buried in a header. Follow it with the invoice number. This single label tells the client’s accounts payable team everything they need to route it correctly.
Step 3: Add Client and Your Own Contact Information
Your full contact details go at the top. The client’s details follow: use their official business name, billing address, and if possible, the name of the accounts payable contact (not just the person you worked with). Sending invoices to the right person can cut days off your payment timeline.
Step 4: Fill in the Dates
Include both the invoice date and the payment due date. Writing “Due: April 30, 2025” is far clearer than “Due in 30 days.” Spell out the month in full to avoid any international date format confusion. This is especially important if you work with clients in different countries
Step 5: Itemize Your Services
List each deliverable or service on its own line. For hourly work, include hours logged and your hourly rate to ensure transparent invoicing. For project-based work, specify each component separately with the agreed project fee. For example:
| Example |
|---|
| Brand strategy consultation: 3 hours @ $120/hour = $360 Competitor analysis report (flat fee): $450 Logo design concepts (3 variations, flat fee): $700 ───────────────────────────────────── Total Due: $1,510 |
Step 6: State Your Payment Terms
Tell the client exactly how to pay and what happens if they are late. List your accepted payment options clearly: bank transfers, card payments, ACH, and any online platforms you use. If you require a deposit before starting, commonly 25%, 30%, or 50%, state that explicitly. If you charge a late fee, make it visible: “A 2% monthly late payment fee applies to invoices unpaid after the due date.”
Step 7: Review, Save as PDF, and Send
Double-check every figure before sending. Save the invoice as a PDF to lock the formatting and prevent accidental edits. Send invoices promptly after project completion or at agreed milestones, attaching them to a short, professional email with a clear subject line such as: “Invoice #042 – [Project Name] | Due [Date].”
Skip the manual process. With Ruul, you can create a professional invoice and send it to clients in any of 190 countries in minutes. No company registration needed.
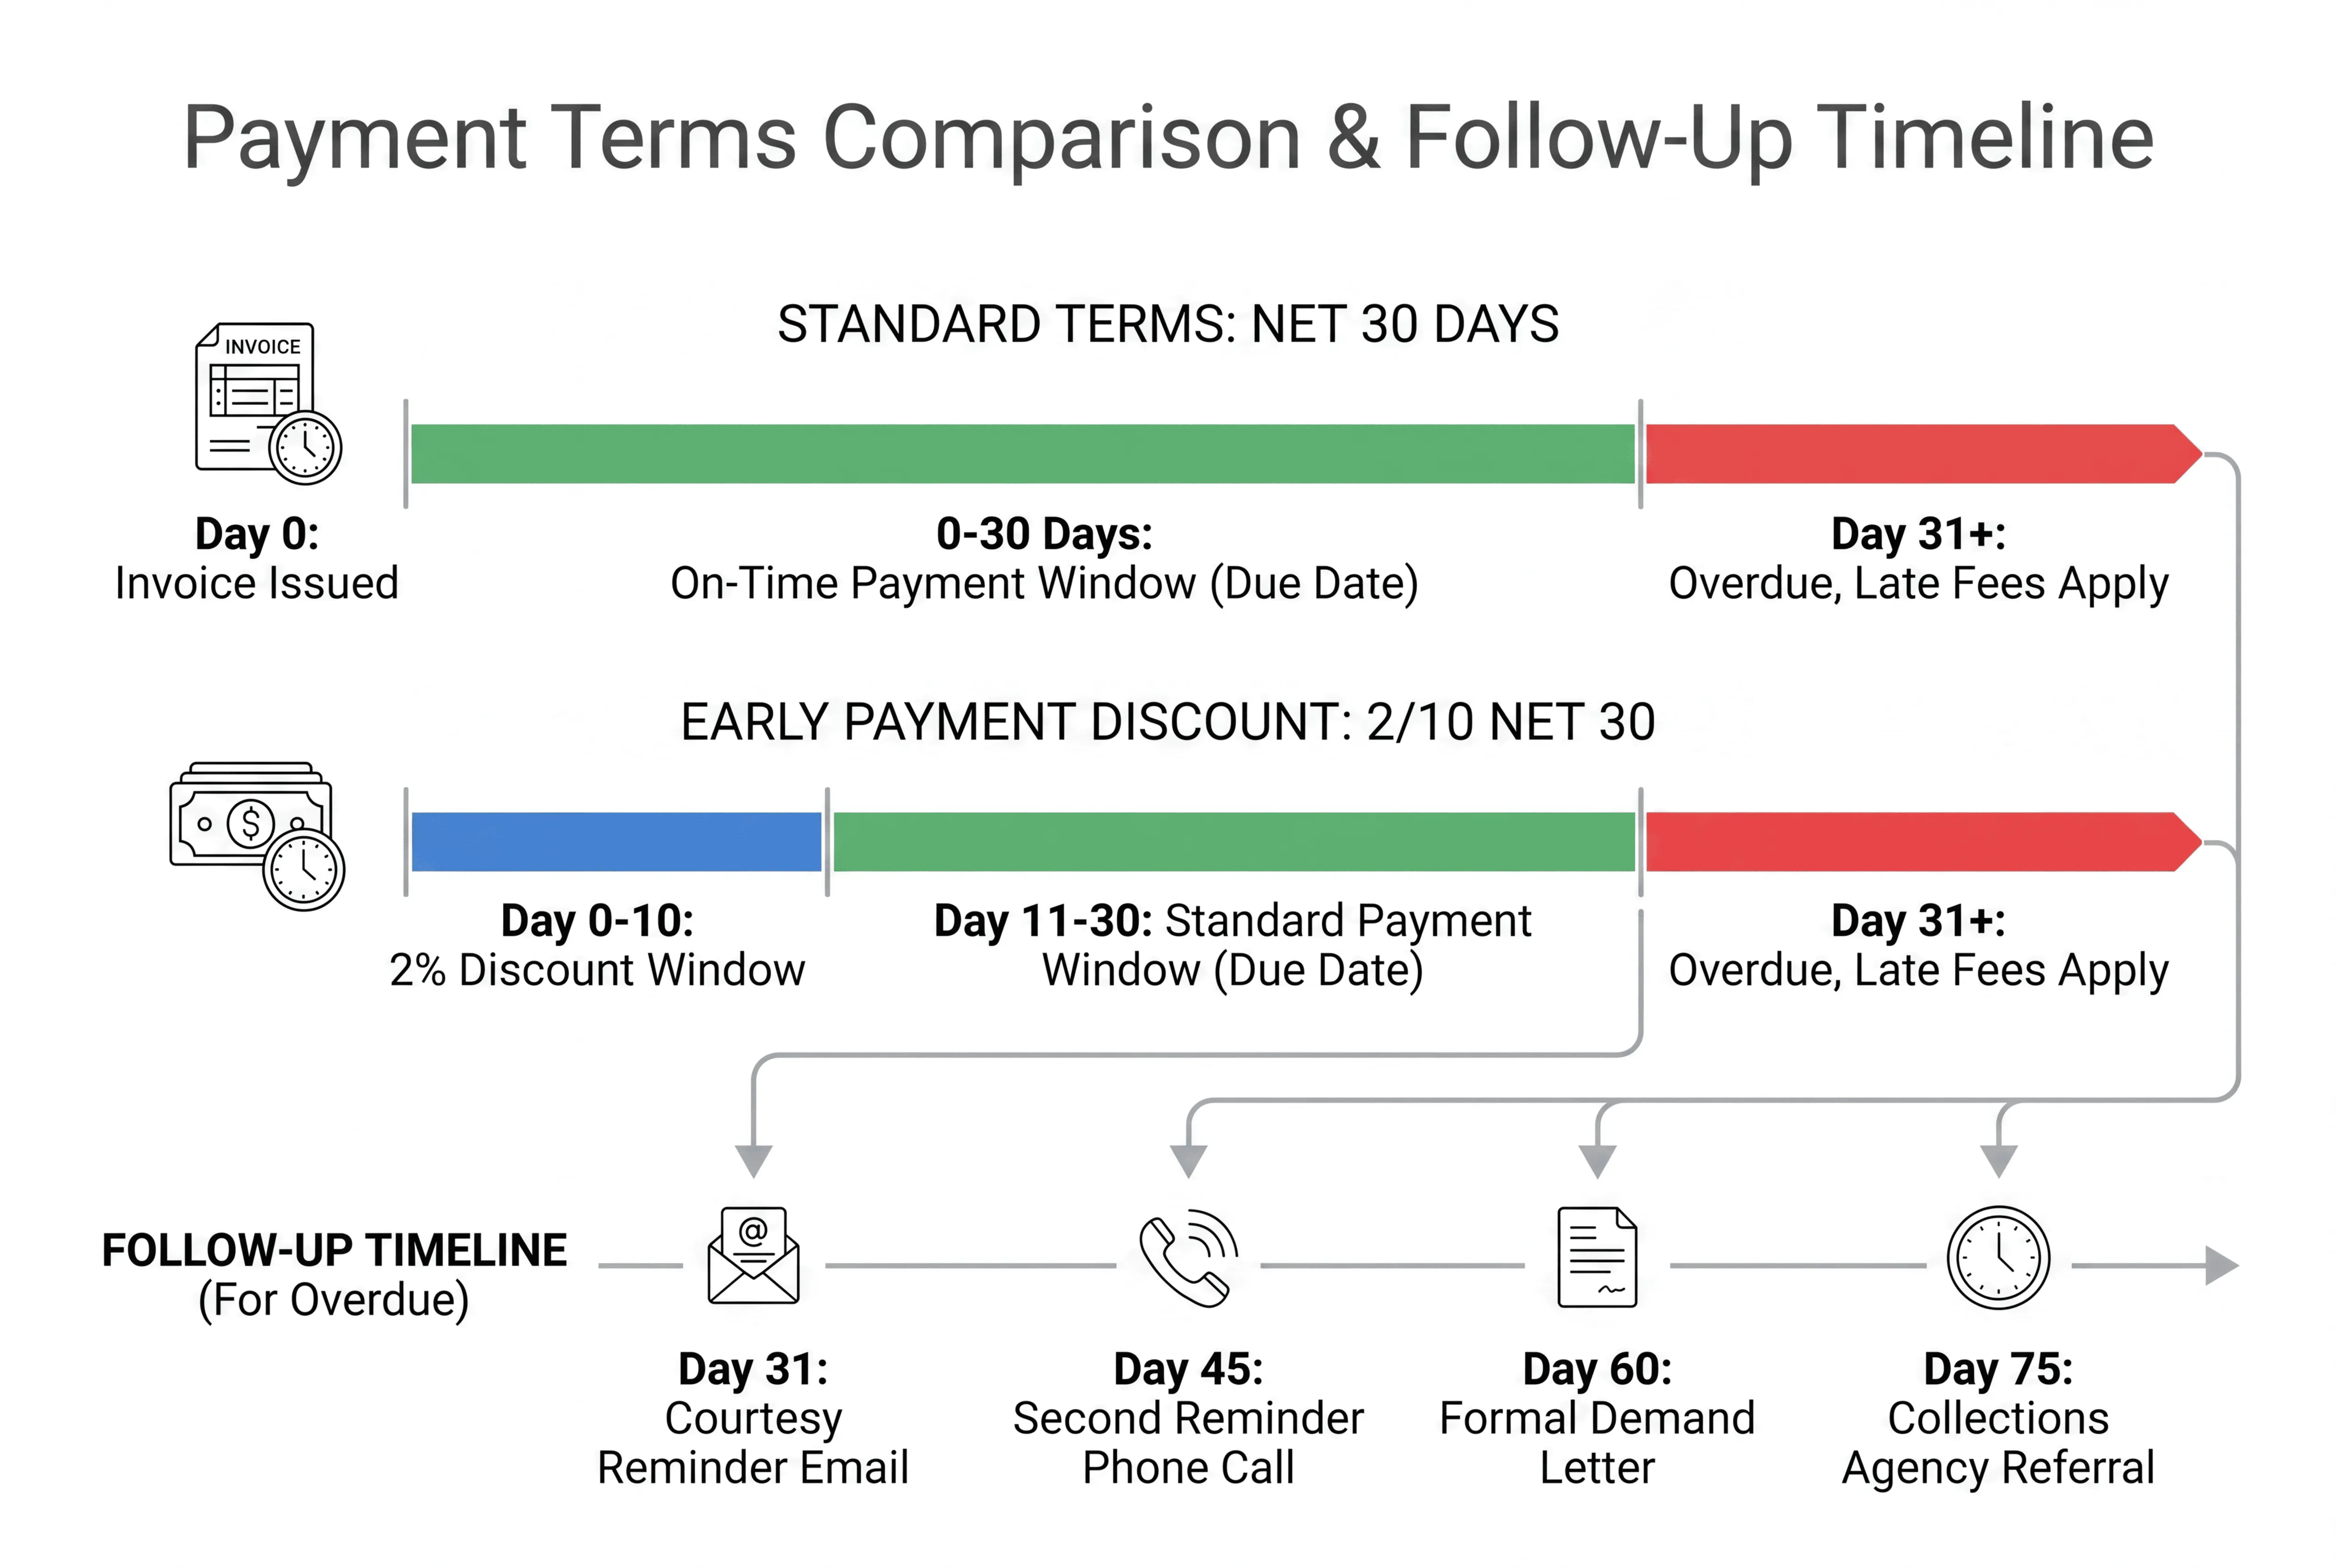
How to Set Freelance Payment Terms
Payment terms define when and how you expect to get paid. Setting clear terms before you start work, ideally in a contract or written agreement, prevents misunderstandings and gives you recourse if a client delays.
This approach ensures efficiency and helps both you and your client stay on track with regular payments.
Common Payment Term Options
| Payment Term | What It Means | Best For |
|---|---|---|
| Net 7 / Net 14 | Payment due 7 or 14 days from invoice date | Small, fast-turnaround projects |
| Net 30 | Payment due 30 days from invoice date | Larger corporate clients with billing cycles |
| 50% Upfront | Client pays half before work begins, half on completion | Large projects with new clients |
| Milestone Payments | Payment tied to specific deliverables (e.g., 30% / 40% / 30%) | Long projects with multiple phases |
| Upon Receipt | Payment expected immediately on invoice delivery | Small projects with trusted clients |
| Retainer | Fixed monthly fee for ongoing access to your services | Long-term clients, recurring work |
Practical Tips for Setting Terms
- Shorter terms get you paid faster. Net 14 consistently results in faster collection than Net 30. Setting shorter payment terms and offering early payment discounts can encourage clients to pay more promptly, leading to faster payments and improved cash flow. Start with shorter terms for new clients and adjust if needed.
- Always specify an exact date. “Net 30” is a starting point, but “Due by May 15, 2025” leaves no room for interpretation.
- Include late fees in your contract and on your invoice. A 1.5–2% monthly fee is common and gives clients a real incentive to pay on time.
- For recurring work, consider setting up subscription billing so payment happens automatically. Platforms like Ruul’s subscription billing let you automate recurring invoices so you’re not manually chasing the same invoice every month.
When to Send a Freelance Invoice
The best time to invoice depends on the type of project you’re working on. For freelance work, sending a freelance invoice promptly after completing the job is crucial to ensure timely payment and maintain professionalism. Here’s a general guide:
- Small standalone project: Invoice immediately upon completion, while the work is fresh in the client’s mind.
- Large project with phases: Use milestone invoicing; bill at each agreed stage rather than waiting until the very end. This protects your cash flow and keeps the client engaged.
- Ongoing or recurring work: Invoice on a consistent schedule (e.g., the first of every month). This trains clients to expect and process your invoices promptly.
- Hourly work: Invoice weekly or biweekly to avoid letting hours pile up unbilled. Attach a time report or timesheet summary when possible.
The key principle: don’t hold your invoice. Sending it promptly after freelance work signals you’re professional and starts the payment clock immediately.
Freelance Invoicing Best Practices
Beyond filling in the right fields, a few professional habits will save you time and prevent problems down the road. When running your own business or managing a freelance business, handling administrative tasks like invoicing and bookkeeping is essential.
Use a Consistent Numbering System
Pick a format and stick to it. Sequential numbers (INV-001, INV-002) are simple and work well for most freelancers. As your business grows, you might prefix by year or client code (2025-ACME-001) to make tracking easier. The goal is to find any invoice in your records within seconds.
Write Service Descriptions Your Clients Understand
Avoid internal jargon or vague terms. Your client, or their finance team, needs to understand exactly what they are approving payment for. “SEO content writing, 3 blog posts, 1,000 words each, delivered April 2025” is clearer than “content delivery.” The more specific you are, the fewer follow-up questions you will receive, and the faster the payment.
Add Branding to Your Invoices
Even simple branding, like your logo, your business colors, and a clean layout, makes a difference. It tells clients they’re dealing with someone who runs a real operation and makes your invoices easier to recognize when they’re scanning through email. Adding a personal touch, such as a personal note or thank-you message on your invoice, can further strengthen client relationships and enhance your professionalism.
A brief thank-you line at the bottom of your invoice adds a personal touch. Something simple like “Thanks for working with me on this” takes only a few seconds to include and leaves a better impression than a blank close.
Offer Multiple Payment Options
The easier you make it to pay, the faster you’ll get paid. Include your preferred payment methods clearly on every invoice, and where possible, use a platform that lets clients pay directly from the invoice with a single click.
Keep Copies of Everything
Store a copy of every invoice you send, organized by client and date. This is essential for tax preparation, income reporting, and resolving any future disputes. A good platform will centralize your invoice history automatically. For more on staying organized for tax purposes, see Ruul’s guide on staying organized and tax-ready.
Communicate Terms Before You Start Work
Payment terms, late fees, revision limits, and delivery timelines should all be discussed and agreed upon before work begins. Your invoice should serve as a reminder of what you already agreed, not a surprise. This is especially important for new client relationships, where expectations have not yet been clearly established.
Common Invoicing Mistakes Freelancers Make (and How to Avoid Them)
Payment issues, such as late or unpaid invoices, often stem from mistakes made during the invoicing process. Streamlining your invoicing process and ensuring accuracy can help you avoid unnecessary delays and disputes. Here are the most common errors to watch out for.
Sending the Invoice to the Wrong Person
Your day-to-day project contact is rarely the person who processes payments. Always ask who handles accounts payable before you send your first invoice. Sending it to the wrong inbox means it sits unread and unpaid.
Using Vague Service Descriptions
“Consulting services – $2,000” will raise questions. “UX research and usability audit for mobile app redesign (5 sessions, April 3–17, 2025) – $2,000” answers them before they’re asked. Be as specific as possible.
Not Including an Invoice Number
Without an invoice number, tracking payments across multiple clients becomes chaotic for both you and your clients. Finance departments almost always require an invoice number to process a payment, so do not skip this.
Waiting Too Long to Invoice
The longer you wait after completing work, the longer you wait to get paid. Invoice promptly, ideally the same day you deliver the work or wrap a project phase. Delayed invoicing can also signal that you may not be tracking your work closely, which can undermine client confidence.
Skipping Payment Method Details
If your invoice does not clearly state how to pay you, including bank details, platform links, or accepted methods, clients will have to follow up to get that information. That extra step can add days to your payment cycle. Make it as easy as possible for them to send money.
Not Specifying Late Payment Consequences
If you have a late fee policy, it must be on the invoice (and ideally in your contract) to be enforceable. Mentioning a fee for the first time after an invoice is overdue creates tension. State it upfront and apply it consistently.
How to Follow Up on Invoices and Handle Late Payments
Even with a perfect invoice, some clients pay late. About 74% of independent professionals experience late payments at some point. Having a follow-up process ready means you don’t have to figure out what to do when it happens.
If a client disputes an invoice or payment that seems intractable, consider mediation with a neutral third party, such as a lawyer or freelance advocacy group, to help both sides reach an agreement. After resolving the dispute, document the outcome in writing to avoid future misunderstandings and update your invoice accordingly.
Your Follow-Up Timeline
- A few days before the due date: Send a short, friendly reminder. Most clients appreciate the heads-up.
- Day 1 after the due date: Email a polite overdue notice. Attach the original invoice again.
- Week 2: Follow up by phone or direct message. Ask if there is an issue you can help resolve. Sometimes invoices get lost or flagged for an unexpected reason.
- Week 3+: Send a formal notice referencing the late fee. If a payment arrangement is needed, document it in writing.
Stay calm and business-like throughout. The goal is to resolve the issue without damaging the relationship, unless the client is clearly acting in bad faith. If repeated attempts fail, you may need to consider formal collections or legal action. This is why having a signed contract from the start matters so much.
Automation can reduce the friction here significantly. Platforms that send payment reminders automatically, both before and after the due date, remove the awkwardness of manual follow-up while keeping your cash flow on track. For a full walkthrough on getting paid reliably, visit ruul.io/get-paid.
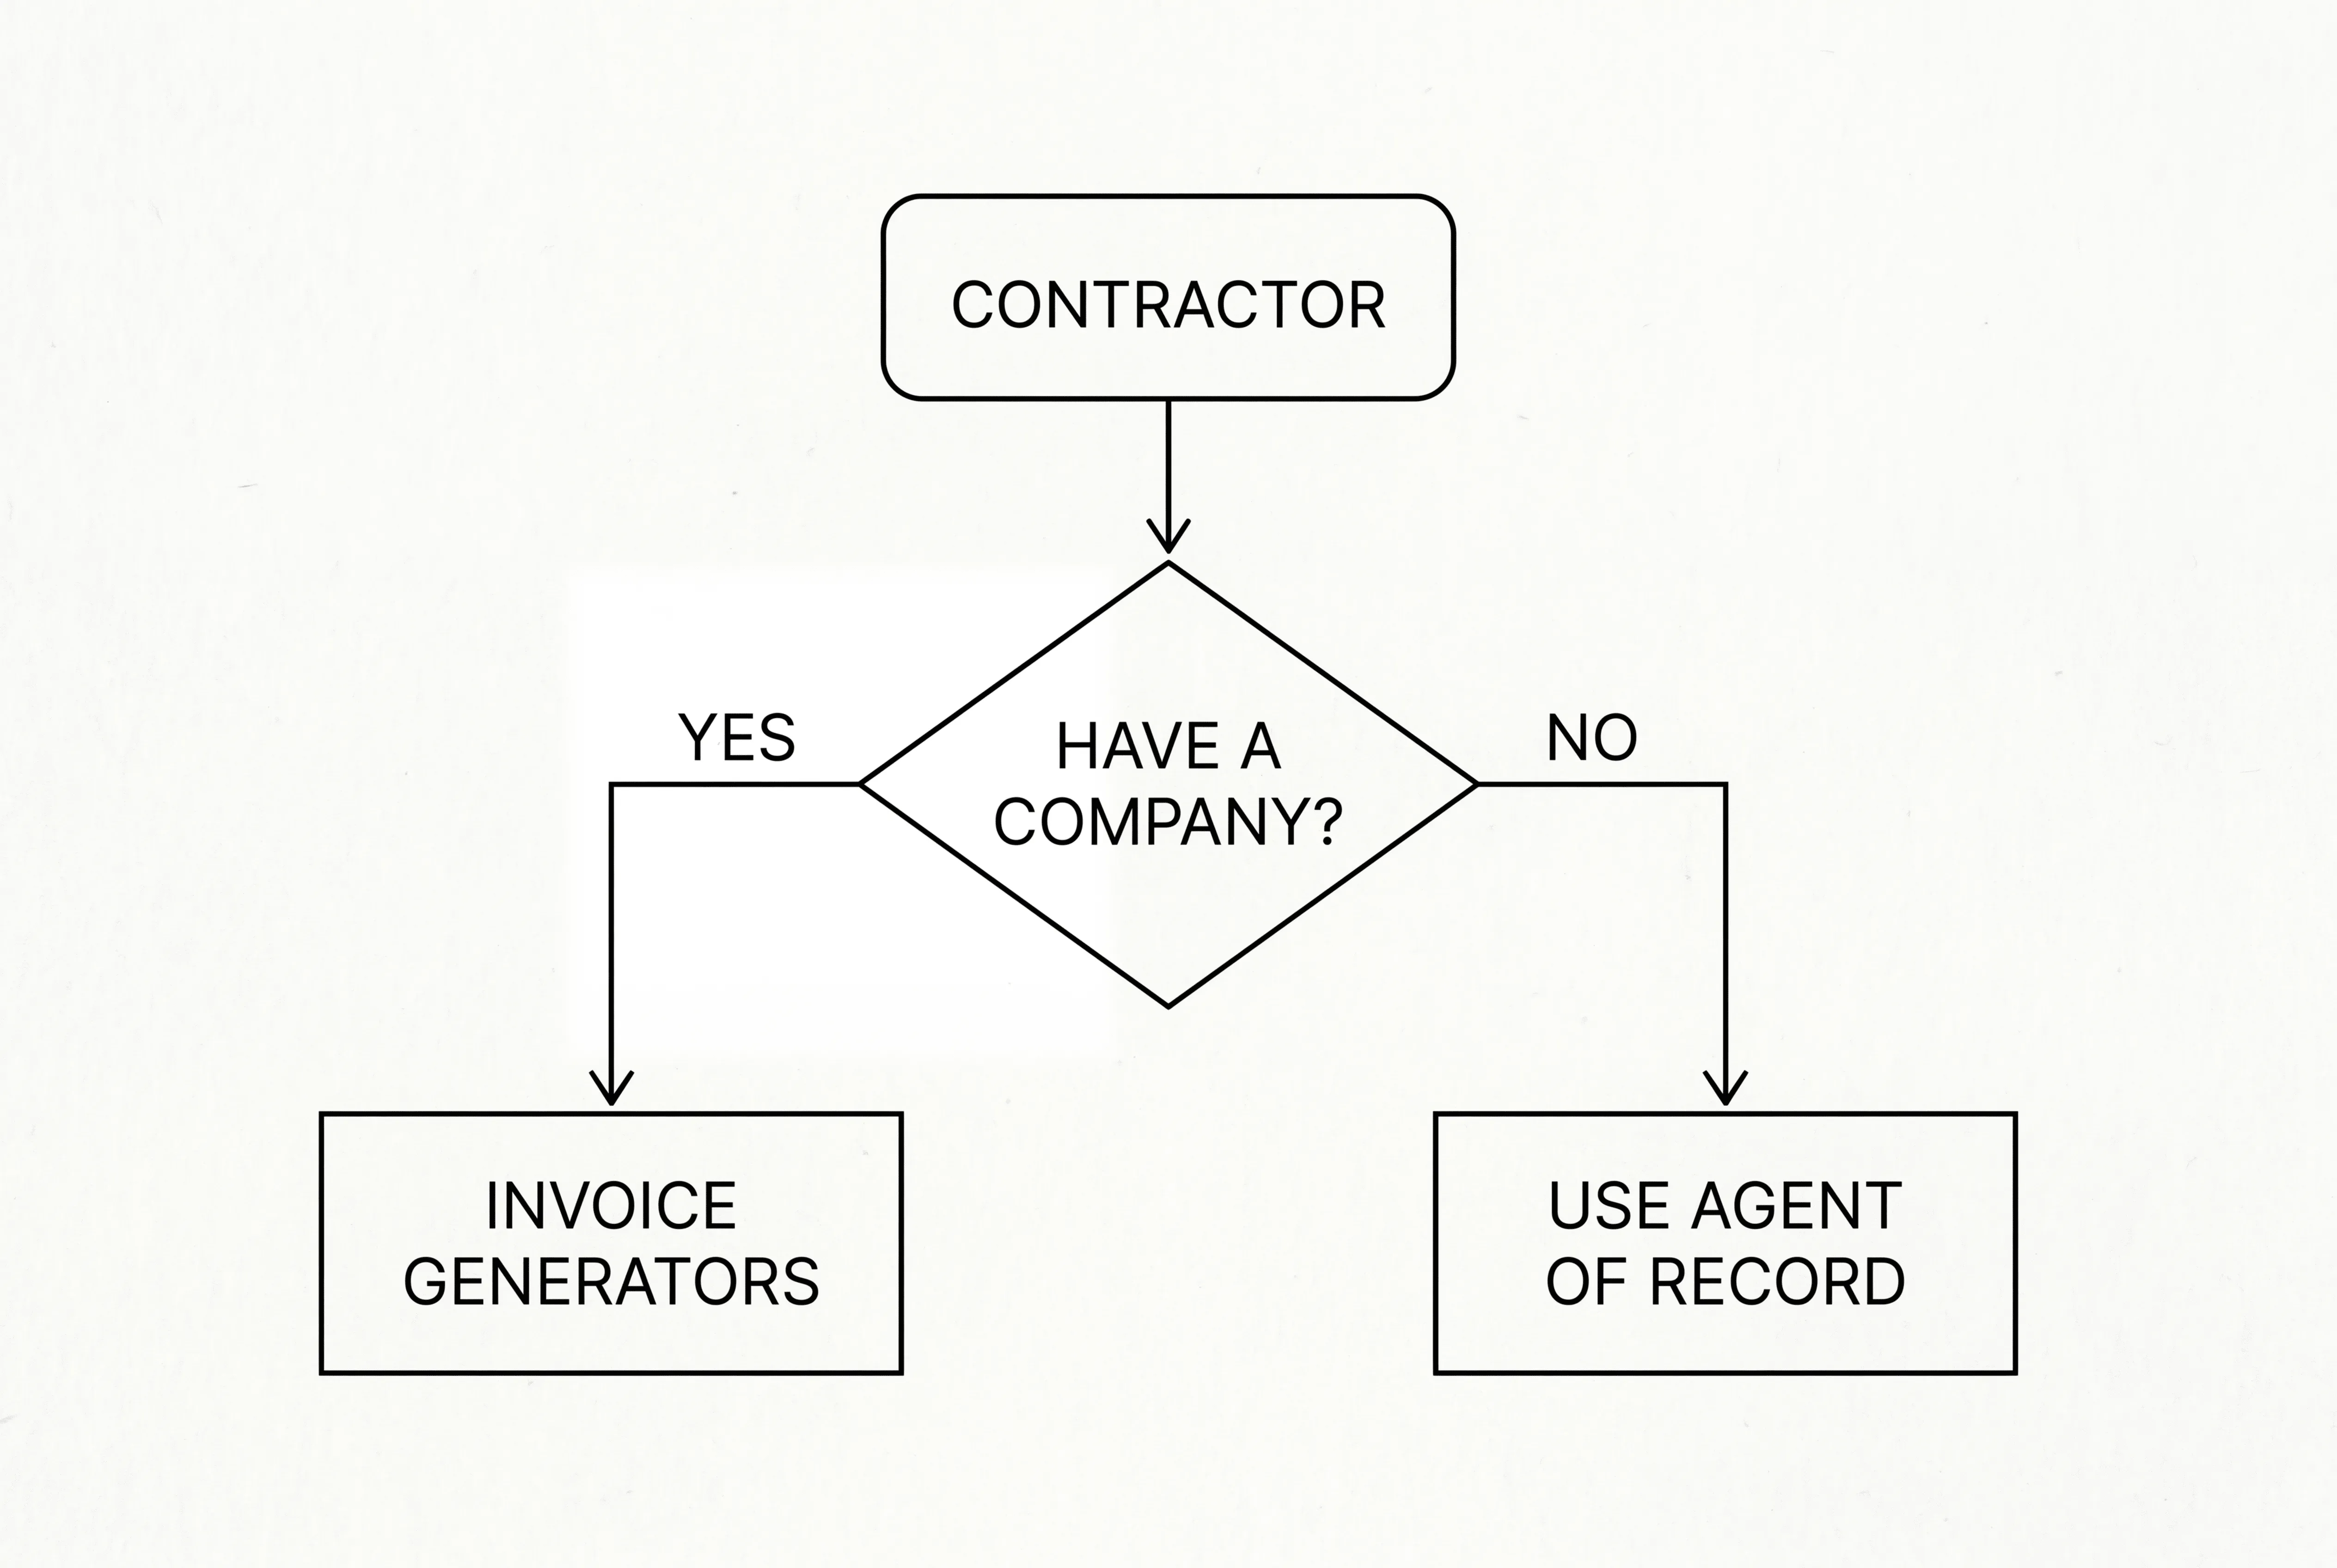
Invoicing Without a Registered Company
One of the most common questions freelancers have is: can I send professional invoices if you do not have a registered business? The short answer is yes, but it depends on your situation.
When you invoice as an individual, you use your personal name and contact details instead of a business name. This is completely normal for sole traders and independent professionals around the world. In many countries you can invoice clients under your own name without any formal company registration.
However, some clients, particularly larger organizations, require the invoice to come from a registered entity for compliance purposes. And if you’re invoicing internationally, you may run into additional requirements around VAT, tax IDs, or local business registration.
This is where platforms like Ruul make a real difference. Ruul acts as an Agent of Record: it contracts with you, issues the invoice to your client on your behalf, collects the payment, and pays you within 1 business day. You never need a registered company, a business tax ID, or a local entity in your client’s country. It’s fully compliant, for both you and the client. Learn more at ruul.io/invoice-without-company.
Invoicing International Clients
If your clients are in a different country, which is increasingly common in the digital freelance economy, there are a few extra things to keep in mind.
- Currency: Specify which currency you’re invoicing in. Ambiguity here can lead to real money lost when exchange rates move. Use tools like a freelance hourly rate calculator to ensure your pricing reflects your costs, target income, and any currency considerations.
- Date formats: Spell out the month to avoid confusion between MM/DD/YYYY and DD/MM/YYYY conventions.
- Tax and VAT: Rules vary significantly by country. Research your client’s jurisdiction or use a platform that handles this for you.
- Transfer fees: International wire transfers and intermediary bank fees can eat into your payment. Clarify upfront who absorbs these costs, or consider alternatives like crypto payments for freelancers that can reduce cross-border friction and costs.
For a comprehensive guide on navigating cross-border invoicing, including multi-currency billing and international compliance, see our dedicated resource on how to invoice international clients.
Tools and Platforms for Freelance Invoicing
Your invoicing method will evolve as your business grows. Here’s a quick overview of the main options:
Freelancers can create invoices using various formats such as Word, Excel, or PDF, and many platforms offer free downloadable templates to streamline the invoicing process. However, using dedicated invoicing tools or accounting software can help you create, send, and manage invoices more efficiently.
Manual Templates (Word, Google Docs, Excel)
The simplest starting point. You create a template once, fill it in for each client, and export to PDF. Works well early on, but becomes cumbersome as you scale; and it doesn’t help you track payments or send reminders automatically.
Dedicated Invoicing Software
Tools like FreshBooks, Wave, or QuickBooks Self-Employed let you create branded invoices, track who has paid, and send automatic reminders. Better than templates, but typically require a monthly subscription and don’t solve the “no company” or “international payment collection” problem.
Agent of Record Platforms
This is where tools like Ruul stand apart. Rather than just generating a document, Ruul acts as the legal counterparty on your behalf. It issues the invoice to your client, handles the compliance paperwork, collects the payment, and deposits it into your account within 1 business day, all without requiring you to have a registered business entity. Over 240,000 freelancers use Ruul to process payments across 190 countries with payouts in 140+ currencies. There’s no setup cost and no monthly fee. Just a 5% transaction commission when you get paid. Start sending invoices at ruul.io/invoice-clients.
Keeping Your Invoices Organized for Tax Time
Good invoicing habits throughout the year make tax season dramatically easier. Keep the following in mind:
- Save every invoice you send, organized by year and client.
- Track payment dates alongside invoice dates; you’ll need this for income reporting.
- Keep records of any late fees collected or discounts given.
- If you work internationally, note the exchange rate at the time of each payment.
- Back up your records in at least two places (cloud storage plus local copies).
Platforms like Ruul give you centralized document storage and exportable transaction summaries, so when your accountant asks for everything, it’s already organized. See how at ruul.io/stay-organized-tax-ready.
Frequently Asked Questions
Is an invoice legally binding?
An invoice by itself isn’t a contract. It’s a payment request. A signed contract or written agreement is what establishes the legal obligation. That said, invoices serve as strong supporting evidence in disputes because they document what work was done and what was agreed. Always have a contract in place, and let the invoice confirm the same details.
Can I invoice as a freelancer without a business name?
Yes. You can invoice under your personal name. Many freelancers start this way. If you want to invoice under a business name without formally registering a company, platforms like Ruul handle the legal entity side for you. They issue the invoice on your behalf, so you never need to create a business structure yourself. Learn more at ruul.io/invoice-without-company.
How do I handle taxes on my invoices?
Tax treatment depends on your country, your client’s country, and the type of service you provide. In many cases, B2B freelance services are not subject to sales tax, but this varies significantly. Consult a local accountant or tax professional for guidance specific to your situation. If you work internationally, Ruul handles the compliance layer for you.
How much should I charge as a late fee?
A common range is 1.5% to 2% per month on the outstanding balance, or a flat fee (such as $25–$50) for invoices under a certain amount. Whatever you choose, state it explicitly in your contract and on the invoice before you start work. Don’t introduce it for the first time after an invoice goes overdue.
Can I invoice in a foreign currency?
Yes. You and your client can agree on any currency. Just be explicit about which currency you’re using on the invoice, and factor in potential exchange rate shifts if you’re billing in a currency different from what you’ll receive. Platforms like Ruul support payouts in 140+ currencies, which simplifies this considerably.
What’s the difference between a recurring invoice and a subscription?
A recurring invoice is one you send manually on a regular schedule. A subscription is automated: the client is charged and the invoice is generated without you needing to do anything each cycle. If you have ongoing retainer clients, subscription billing saves you time and ensures you never forget to invoice.
Ready to Start Invoicing Like a Pro?
Invoicing well is one of the highest-leverage things you can do as a freelancer. It protects your income, projects professionalism, and keeps your business running smoothly, whether you work locally or with clients around the world.
If you’re ready to take the friction out of invoicing, especially if you work internationally or don’t have a registered company, Ruul makes it simple. You can create your first invoice in under 2 minutes, get paid in 1 business day after your client pays, and never worry about company registration or compliance paperwork.
Create your first freelance invoice in 2 minutes, no company registration needed. Join 240,000+ freelancers worldwide who use Ruul to get paid faster. Get started for free at app.ruul.io/register.
Related articles
Freelance Invoice Templates by Profession
Freelance InvoicingApr 5, 2026
Choosing the Right Invoice Tool for Freelancers
Freelance InvoicingJun 20, 2026
Best 5 Free Invoice Generators
Freelance InvoicingApr 6, 2026
Top Invoice Apps for Freelancers
Freelance InvoicingJun 16, 2026
DAC7 Directive: A comprehensive look at the EU's latest tax regulation
Freelance InvoicingApr 3, 2026